Modern Cinephile's Movie Player
Can we get a big one [set piece] in the first five minutes? We want people to stay tuned in — Matt Damon1
Are you tired of being distracted by some exciting and mentally stimulating film when you’re just trying to doomscroll all your problems away? Then look no further, I present to you the video player for the modern cinephile!
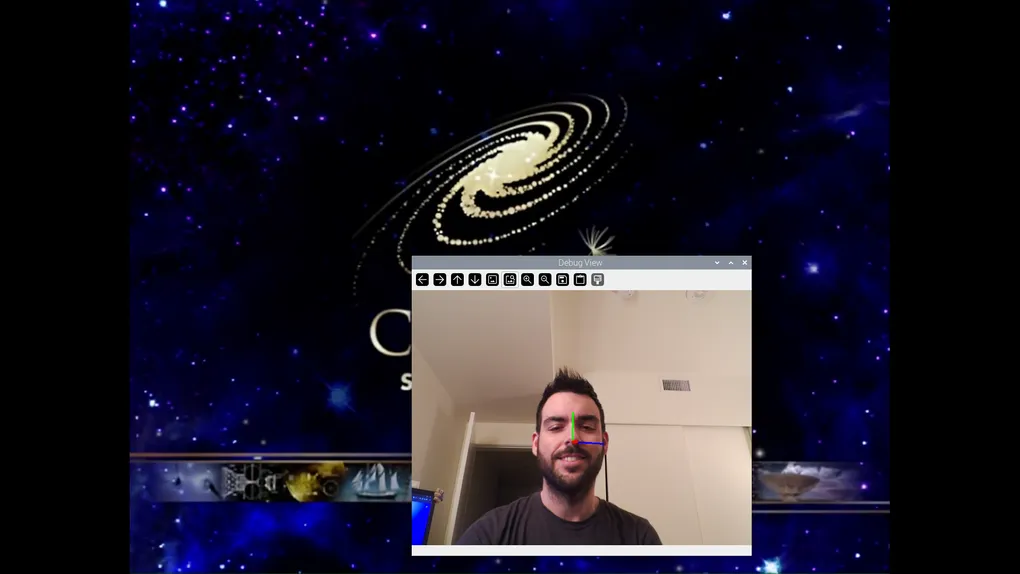
This modern all-in-one video playing machine actively tracks the gaze of your eyes and the overall direction of your face, playing only when no one is looking, and pausing the instant someone engages with the screen. Finally, you can throw on those boring, “classic” movies without having to worry about actually being distracted from your phone or laptop for longer than a few seconds. 👍
- Skip to the code
- Skip to the Technical Details
Your attention, please
Overly explanatory movies and TV shows are fast becoming the new norm. Scroll through the catalog on most streaming platforms these days and you’ll find no shortage of what appears to be low-grade “slop” movies and shows, seemingly designed from the beginning to be nothing more than background noise. Netflix has even been quoted as going so far to ask their screenwriters to have characters “announce what they’re doing so that viewers who have this program on in the background can follow along.”2
While Netflix is arguably the worst offender in this category, I’ve even noticed this trend in the highly acclaimed and award-winning show Severance on Apple TV+. The show layers the irony and satire on thick and, at times, will then still continue to bash you over the head with the message they’re trying to send. With Severance specifically, it often felt like the producers kept “dumbing down” the content in the show. It’s getting hard to tell these days how much of this over simplification is geared towards ensuring that the average viewer is able to keep up with the concepts and themes being represented in the show vs how much of this simplification is because they know the average viewer will drift in and out. Spoiler As a specific example, even the intro in the first season is guilty of this in my opinion. The way there are two bodies on the bed at the end, then they merge together, as if the message wasn’t clear enough already.
I’m not sure there’s any concrete evidence yet of a correlation between the rise of smart phones and social media and what appears to be a steady decline in the average user’s attention spans3 over the years, but, regardless, here we are. Streaming platforms are no doubt exacerbating this issue due to the very nature of their business model, which is a monthly subscription fee not based on the amount of the content consumed, like ticket sales in theaters, but rather the quantity and quality of content available. The more content they have, the more likely you are to find something to watch, and the more likely you are to stay subscribed. Creating quality content is expensive and difficult, but cranking out mediocre content that appeals to the lowest common denominator is becoming easier than ever.
As of the latest writing of this post, Netflix has additionally launched their own short-form vertical video feed, Clips4. This short-form video platform joins the fray right next to YouTube Shorts, Instagram Reels, and TikTok, all catering to the ever-shrinking attention span plaguing society. The pitch here is slightly different, of course, with the goal being to actually expose users to new content and encourage them to switch from an interesting short clip to checking out an actual full-length episode or movie. I’m left wondering how sincere that actual proposal is and I’d be curious to know the actual stats on conversions users are taking from those clips to the actual content. I have a sneaking suspicion Clips will ultimately be nothing more than another infinite scrolling feed of slop… (welcome back doom-scrollers! It’s like you never left…)
Technical Details
At a high-level, the project is simple to understand both conceptually and programmatically. We start an instance of VLC running a video playlist on loop, a camera is running constantly streaming video, we capture a still image from the video feed, pipe that image into a library (mediapipe) which uses classic machine learning models to detect a face and its landmarks (features), and finally we use the output from that to determine if someone is “watching” the screen and pause the video if so.
To my pleasant surprise when starting this project, mediapipe has abstracted and simplified much of this process already.
MediaPipe is an open-source framework by Google that enables developers to create real-time, cross-platform machine learning solutions for live video, audio, and streaming media
MediaPipe provides interfaces already for “face landmarker” detection, including blendshapes, which we can use to determine 3 things (in this order):
- Is a face detected in the image? (we get a valid result from our FaceLandmarker instance)
- Are the eyes staring at the screen? (analyze the blendshapes from MediaPipe, compare these values to a threshold to determine if a user is staring straight or anywhere else)
- If the eyes are staring elsewhere, we fallback to detecting facial landmarks
- To do this, we ultimately create a set of points (XY coordinates) that represent features on the face (nose, eyes, ears, mouth) and we plot these points on a canvas the same size as our image (based on resolution) as if this face was facing directly towards the camera. We then solve what’s referred to as the Perspective-n-Point problem (PnP), which is a process used to determine the approximate pose of our camera in a 3D space by mapping a set of n 3D points (hence the
n-Pointin the name) and mapping those to their corresponding points on the 2D image5. We’ll touch on this a bit more below.
- To do this, we ultimately create a set of points (XY coordinates) that represent features on the face (nose, eyes, ears, mouth) and we plot these points on a canvas the same size as our image (based on resolution) as if this face was facing directly towards the camera. We then solve what’s referred to as the Perspective-n-Point problem (PnP), which is a process used to determine the approximate pose of our camera in a 3D space by mapping a set of n 3D points (hence the
We use a Raspberry Pi 5 (RPi) as the underlying work-horse powering all the components and logic. The official charger recommended for use with the RPi (a 27W PD Power Supply 5.1V 5A) works beautifully to power the RPi itself, the monitor (via USB-C), and the camera module, allowing this device to essentially act as an all-in-one computer.
Perspective-n-Point Problem
Solving this Perspective-n-Point problem is the primary challenge in this project. The blendshapes provided by MediaPipe are pretty accurate and work well to determine if a user is looking directly at the screen or not, but they don’t do a great job of determining the direction of the user’s gaze when they’re not looking directly at the screen. This is where the PnP problem comes in. This is a well-known problem in computer vision and has been studied extensively, but was something I had yet to encounter myself until working on this project.
The goal of the PnP problem is to determine the pose of the camera (in our case, the RPi camera) relative to an object (the user’s face) by using a set of known 3D points (this is the n points part) and their corresponding 2D projections in the image. For this project, we create our own set of known 3D points based on the average human face, which we can then use to solve the PnP problem and determine the approximate pose of the user’s face relative to the camera. What’s actually happening is we’re determining the pose and positioning of the camera, not the face itself, but since the camera is fixed in place and the face is moving, we can infer the pose of the face based on the pose of the camera in relation to the face.
To really simplify this, let’s get specific. Let’s pretend we have a 2D face centered in the middle of a photo staring directly at the camera. We can just say that the tip of the nose is at point (0, 0, 0) and then work backwards from there to find similar 3D points for the left eye, right eye, left ear, etc. It’s not so much about being exactly correct, but finding a common ground that works across most faces. Then we take those arbitrary 3D points and basically map them to where the actual facial features are in the 2D space we’re viewing (the photo). Once we know the difference between the 3D points and the 2D points, we combine that information with some assumptions about the details of the “camera matrix” itself (a camera matrix is basically how we approximate how a camera “sees” from a computing perspective based on things like the focal length, principal point, and whether the camera itself is rotated or closer/further away from the subject).
Now we have everything we need: we have the “original” 3D points in space, we have the real 2D points coming from the photo itself, and we have info about the camera matrix (how the photo was captured). Now we can use all of that to solve the question of how/where the camera is in relation to the subject (those 3D/2D points we mapped earlier). As we mentioned previously, since the camera is fixed, we know that when we’re calculating the “camera’s” rotation/translation, we’re actually calculating the face’s rotation/translation. To do the actual calculation, we use OpenCV library’s SolvePnP method6.
Setup
To get up and running quick, create a videos directory in the root of this project and drop some .mp4 or .mkv files in there.
This project is intended to run on a Raspberry Pi (specifically Raspberry Pi 5) using a Pi Camera Module first and foremost.
Raspberry Pi Specs:
- Hardware - Raspberry Pi 5, 8 GB RAM
- Storage - 32GB microSD card
- Camera - Raspberry Pi Camera Module 3, Wide-Angle Lens
- Operating System - Raspberry Pi OS (Legacy, 64-bit) (Bookworm)
- This distro and version seems to have the best package support for mediapipe and related picamera2 dependencies from my limited testing.
- Kernel - version 6.12
Clone the repo: https://github.com/rickjerrity/modern-cinephile/tree/main
First, update packages on the Raspberry Pi:
sudo apt update && sudo apt upgrade -y
Next, install the necessary libraries to use picamera2:
sudo apt install libc6-dev libcap-dev
Install the uv Python package/project manager (uv installation):
curl -LsSf https://astral.sh/uv/install.sh | sh
source $HOME/.cargo/env
Configure your uv venv to access system packages as well, so you can access the libcamera module:
uv venv --system-site-packages
Install the dependencies and run the script:
uv pip install -r pyproject.toml
uv run main.py
That’s all folks ✌️